

android app material design template
In this tutorial, I'll show you how to implement Android Material Design for your apps running on pre Lollipop devices. Material Design is Google's new design language for Android apps, replacing the previously used Holo theme.
A material metaphor is the unifying theory of a rationalized space and a system of motion. The material is grounded in tactile reality, inspired by the study of paper and ink, yet technologically advanced and open to imagination and magic. Read more about it here.
I will be using Android Studio 1.1 (you should too!). My gradle settings are (by default):
- compileSdkVersion 22
- buildToolsVersion 22.0.1
- minSdkVersion 9
- targetSdkVersion 22
- appcompat-v7:22.1.1
NOTE: This new version of AppCompat released a lot of changes, so you might want to read further what exactly is changed.
If you want to implement Material Design for Tablets, you can get started here.
Setting up the project
Create a new Studio project with the following:
- Check Phone and Tablet
- Minimum SDK: API 9
- Blank Activity template
You may immediately notice a new folder calledmipmap, instead of drawable density folders. Just remember that, mipmaps store your launcher icons. You can create the regular drawable folders as before and continue to use them. More on mipmaps here.
Check yourbuild.gradle file for the following dependency
dependencies { compile com.android.support:appcompat-v7:22.0.+" ... } Set up theme
Brand Colors
The app requires you to define 3 colors for your brand identity:
- primary 500– main color of your app. Used in toolbar.
- primary 700– a darker tint of the primary color. Used for the status bar.
- accent– different color, used in action buttons and components like sliders or switches.
You can refer them from the official material color palette , or define your own.
Go tores/values and createcolors.xml. Here are my colors:
<!--Blue 500--> <color name="colorPrimary">#2196F3</color> <!--Blue 700--> <color name="colorPrimaryDark">#1976D2</color> <!--Red A200--> <color name="colorAccent">#FF5252</color>
Add colors to your theme
Now that we've created the colors, we need to tell the theme to use them. Open yourstyles.xml inres/values and add the colors like this:
<item name="colorPrimary">@color/colorPrimary</item> <item name="colorPrimaryDark">@color/colorPrimaryDark</item> <item name="colorAccent">@color/colorAccent</item>
UPDATE:Since AppCompat v21.1.1, you need to make sure your themes inherit from parent="Theme.AppCompat.Light.NoActionBar". Otherwise you'll get an error similar to the one over here at Stack Overflow.
Theming for Lollipop
By default when creating your project, the parent theme in res/values/styles.xml would beTheme.AppCompat.Light.DarkActionBar. Using AppCompat on Lollipop devices, elevates the theme to the real Material theme. In other words, we will be inheriting the same theme.
Creating a folderres/values-v21 and createstyles.xmlunder it.
<style name="AppTheme" parent="Theme.AppCompat.Light.NoActionBar"> <item name="android:colorPrimary">@color/colorPrimary</item> <item name="android:colorPrimaryDark">@color/colorPrimaryDark</item> <item name="android:colorAccent">@color/colorAccent</item> </style>
Notice that the only difference between the styles.xml under values and values-v21 is the prefix "android".
Hello Toolbar
Since Lollipop, ActionBar is now deprecated. A new component calledToolbar was introduced instead which is easier to use and more versatile. This can be used as any other normal view in your activity layout.
Createtoolbar.xml in yourres/layout folder. Apart from the compulsory width and height. You need the theme and minimum height (line 7 & 9) defined at the least.
<android.support.v7.widget.Toolbar xmlns:android="http://schemas.android.com/apk/res/android" xmlns:app="http://schemas.android.com/apk/res-auto" android:id="@+id/toolbar" android:layout_width="match_parent" android:layout_height="wrap_content" android:background="@color/colorPrimary" app:theme="@style/ThemeOverlay.AppCompat.Dark.ActionBar" app:popupTheme="@style/ThemeOverlay.AppCompat.Light" android:minHeight="?attr/actionBarSize" />
The toolbar MUST use the primary color as per Material Design guidelines. It can be referenced via ?attr/colorPrimary as well. Default toolbar height is set using?attr/actionBarSize. I've used a dark Toolbar theme so that my text by default is white against my background. Since a dark theme is set, the popup will be dark as well. To keep overflow menu light, hence I've set a light theme for it.
Now before we use our Toolbar, we need to tell our themes to NOT display a default ActionBar first. Add the following line tostyles.xml in both your values and values-v21:
<item name="android:windowNoTitle">true</item> <item name="windowActionBar">false</item>
While we're at it, why not allow Lollipop to make use of its beautiful activity transitions? Add these lines to yourstyles.xml undervalues-v21.
<item name="android:windowContentTransitions">true</item> <item name="android:windowAllowEnterTransitionOverlap">true</item> <item name="android:windowAllowReturnTransitionOverlap">true</item> <item name="android:windowSharedElementEnterTransition">@android:transition/move</item> <item name="android:windowSharedElementExitTransition">@android:transition/move</item>
Adding the toolbar
Since toolbar is a view, we need to add it to our activity layout. Openres/layout/activity_main/xml. Firstly, remove the default padding in RelativeLayout, and add this line below:
<include layout="@layout/toolbar" />
As per convention, the Toolbar must be defined in a separate XML file (toolbar.xml)and then must be included in our layout by using the <include> tag.
Now, earlier after including the Toolbar, any layout I added below it, would automatically have some padding. That is after setting the Toolbar as an ActionBar,the views below wouldn't overlap the toolbar. Oddly, after the newAppCompat-v22 update, I find the layout overlapping.
Now for those of you who find your layout overlapping the Toolbar, its a relatively simple fix. Just add a android:layout_marginTop="?attr/actionBarSize" to your layout. Like for instance how I've added it to my RelativeLayout below the Toolbar.
Toolbar as ActionBar
Lastly, we need to tell Android to use our specified toolbar to behave like an ActionBar. Once this step is done, we can interact with it like we used to with the ActionBar. Enough XML for now, let's dive into Java. Open yourjava/packagename/MainActivity.java and reference the toolbar.
Create a toolbar variable and initialize like you normally would for any view.
public class MainActivity extends AppCompatActivity{ Toolbar toolbar; @Override protected void onCreate(Bundle savedInstanceState) { super.onCreate(savedInstanceState); setContentView(R.layout.activity_main); toolbar = (Toolbar) findViewById(R.id.toolbar); setSupportActionBar(toolbar); ... UPDATE: You must now extend AppCompatActivity as ActionBarActivity is deprecated.
The key is line 10 where it instructs the activity to use our Toolbar as its ActionBar. After this, the Toolbar can be referenced as a regular ActionBar using getSupportActionBar() to perform your actions.
That took longer than expected! Time for some action. HitShift+F10 to compile your app and run. Your app should be looking like this.
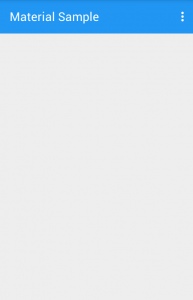
As seen on Jelly Bean 4.2.2
Now you may notice, why is there no shadow under my toolbar? That because we need to add it. It won't be included by default.
Toolbar Shadow
Now there are two ways of doing this.
- Use a 9-patch for the shadow
- Create one using XML
Now I'm going to keep this clean and use an XML generated shadow for my Toolbar. After that, we can reference this shadow as a view in our layout.
Createshadow.xml underres/drawable/.
<shape xmlns:android="http://schemas.android.com/apk/res/android" android:shape="rectangle"> <gradient android:startColor="@android:color/transparent" android:endColor="#40000000" android:angle="90" /> </shape>
The XML is simply a gradient that goes from from a 64% of black (#000000) to a transparent color (The first 2 values after the # is the hexadecimal value for opacity). The angle specifies the direction of the gradient. We need it vertical, hence 90.
For a more detailed how-to on Toolbar elevation (shadow) , I suggest you read this.
Head back to your activity_main.xml.We now need to include the shadow we just created as a view directly BELOW our toolbar.
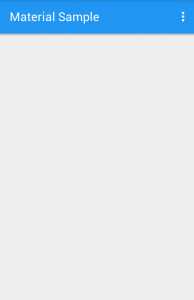
Toolbar with shadow drawable
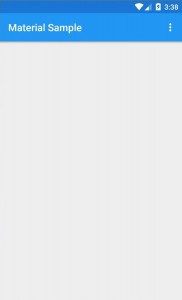
Toolbar with shadow drawable on Nexus 5 Lollipop
Now some of you may ask "Why not use the toolbar elevation property?". That property applies only on Lollipop devices. For pre-Lollipop, we're on our own.
Honestly, there's not much of a difference between the two shadows as you can see above, but if you really want to use that elevation instead of the shadow drawable on Lollipop at least, then you could do this:
- Check if the Android SDK version is Lollipop
if (Build.VERSION.SDK_INT >= Build.VERSION_CODES.LOLLIPOP) - If it is, then remove the shadow View with
view.setVisibility(View.GONE); - Elevate the toolbar using
getSupportActionBar().setElevation(4);
IMAGE CREDIT:Google Material Design
You can download the sample project here or head over to GitHub.

Product Designer who occasionally writes code.
android app material design template
Source: https://blog.iamsuleiman.com/android-material-design-tutorial/
Posted by: musialanated1978.blogspot.com
0 Response to "android app material design template"
Post a Comment